What are Billable Hours
Billable hours are invoiceable time you spend working on a client’s project. They are not limited to obvious tasks, like delivering a service or creating a product. Depending on your agreement with your customer, they may include your time on emails, phone calls, meetings, research, and project-related travel.
Tracking these hours accurately is crucial. It ensures you’re compensated fairly for all your efforts. Practicing transparency regarding your billable hours will build trust with your clients. Many professionals use time-tracking tools or software to log their billable hours precisely.
It’s also important to distinguish billable hours from non-billable ones. Non-billable hours include administrative tasks, internal meetings, or professional development—essentially, work that keeps your business running but isn’t directly tied to a client’s project.
Followed scenario
In this article, to illustrate more easily how to calculate your billable hours, we assume you’re a content creator with a new project.
Project name: Write a blog article about dog food.
Project activities:
- Online research
- Speak with friends who are dog owners
- Write the draft and send it to the client for feedback
- Write the final version
- Proofread
- Search for a representative image
- Send the article to the client
How to calculate billable hours
STEP 1 – Set your rates
For each project, you should specify whether it is billable and set the hourly rate. This step will allow PlanArty to make the calculations you need automatically.
For example, if you’re an article writer and work at the same rates for all your clients, it’s enough to create one project. However, if you have different rates for different clients or various project types, you should define as many projects as there are rates you use. If you’re a photographer, you might have projects like Wedding Photography, Family Photos, and Graduation Photos—all with different hourly rates.
STEP 2 – Track your time
The next step is to track your time. Whenever you begin working on a project, start your tracker, specify what you’re doing, and select the appropriate project. When you’re done working on it, stop the time logger. If you need to interrupt your work for some reason—for example, a lunch break—stop your time tracker. Once you start working again, you can easily restart it with a single click, as shown in the video below.
As you can see, PlanArty records two separate time tracks. It even shows you that the first one is not closed yet.
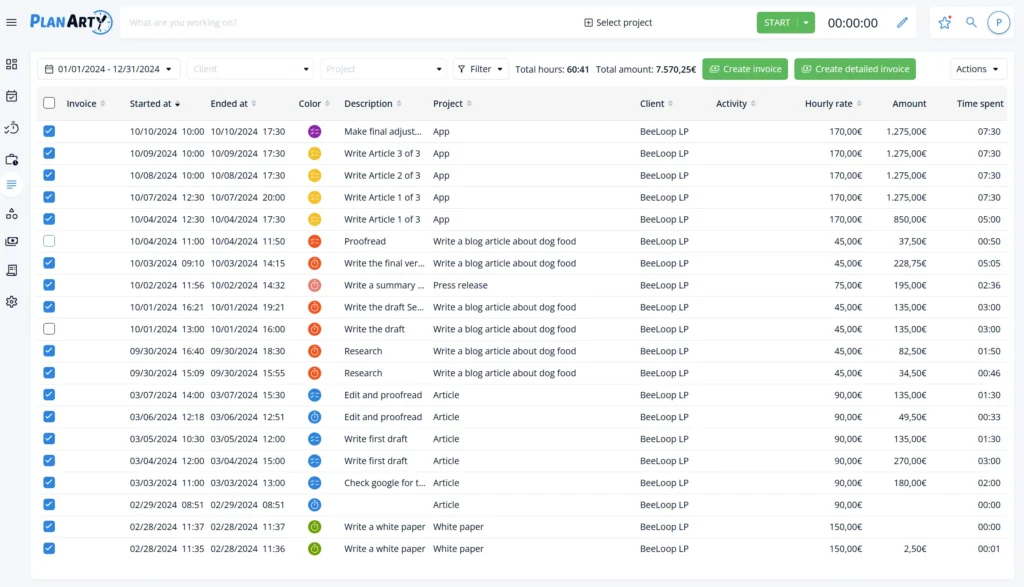
Repeat the above steps each time you work on a project until you finish it. Ultimately, you will have a complete record of all your time spent on the project, as shown in the image below.

PRO TIP
With PlanArty, you can include tasks from your to-do list directly into your billable hours. For example, if you block out 2 hours to work on a specific project, there’s no need to track that time separately. Just mark the task as “Done” when you’re finished, and PlanArty will automatically add it to your list of billable hours.
STEP 3. Separate billable hours from unpaid work
Not all the time you invest in a project is billable. Crucial activities like project management, invoicing, or creating client offers are necessary but can’t be directly invoiced.
If you skip recording these tasks, you might miscalculate your profitability. For example, earning $150 for five billable hours seems like $30 per hour, but if you actually spent 6 hours, including non-billable time, your real rate is $25 per hour.
With PlanArty, you can record all your project time and designate non-billable tasks, giving you an accurate picture of your total time and correct invoicing amounts. To exclude a task from billing, edit the time entry in PlanArty and uncheck the “Billable” option.
STEP 4. Invoice your billable hours
When you’re ready to invoice a project, simply go to the “Billable list” page and filter the data by the project name. PlanArty will display all your time tracks associated with that project, including to-do items marked as “Done.” You can select which items you want to include in the invoice—by default, all listed records are selected.
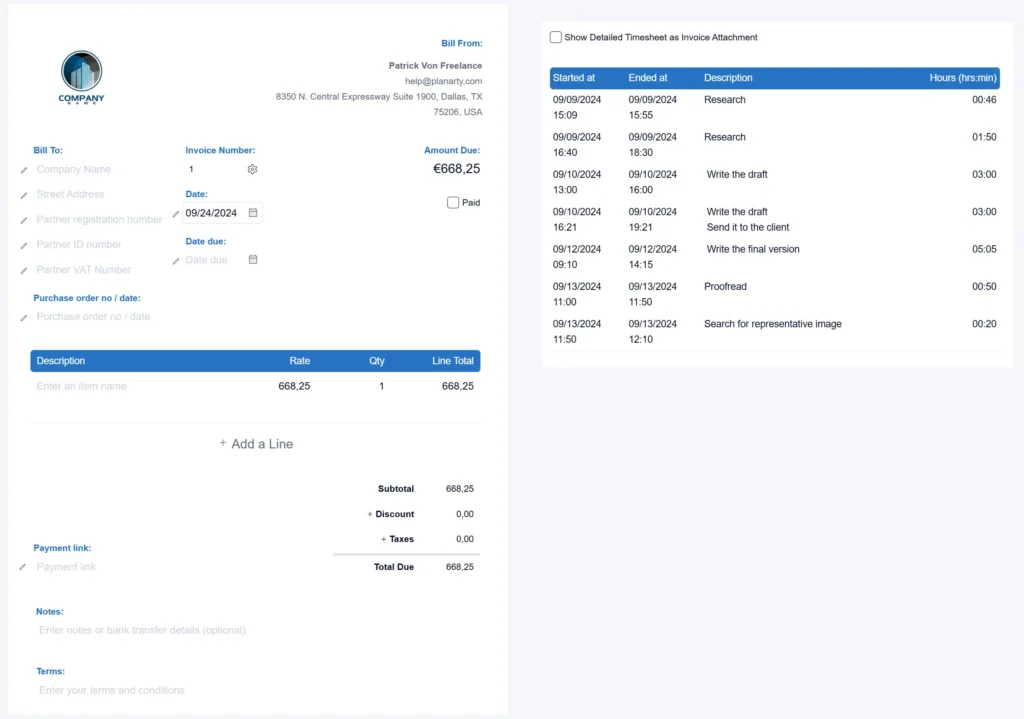
Once you’ve chosen, click the “Create Invoice” or “Create Detailed Invoice” button. The app will automatically perform all the calculations and generate the invoice.
- Create Invoice: This option generates an invoice with a single line, summing up all the items from your Billable list.
- Create Detailed Invoice: This option produces an invoice with individual lines for each entry in your Billable list.
You can also enable the “Show Detailed Timesheet as Invoice Attachment” option, which automatically attaches your complete Billable list to the invoice. Clients often appreciate this added transparency of detailed invoicing , which can lead to faster payments.
To further improve your chances of prompt payment, you can generate a payment link from your payment gateway and include it in the Notes section of your invoice. This link will appear as clickable in the PDF version of the invoice, making it easy for your client to initiate payment with just a click.

PRO TIP
You can export your billable list in Microsoft Excel format, allowing you to customize and analyze your data further. Once exported, you can use the information to fit your specific needs. For instance, you can create pivot tables or generate charts and graphs to visualize your work patterns, making it easier to track trends, identify areas for improvement, or present the data in a more organized and visually appealing way.
You can further customize your invoice by adding your logo and setting the applicable taxes.


